LVM in LUKS with encrypted boot and suspend-to-disk
Preface
Motivation
I’ve been wanting to get this working for a long time and in previous attempts I’ve had different issues with it, some of which I encountered this time around as well, but found solutions to. After getting the results I wanted, here are my notes as a guided setup. I’m sure my future self will appreciate this as well.
Notes
This setup shows how to set this up for both UEFI and BIOS systems.
Your motivation may be different than mine. I urge you to take a read on what the different security options LUKS might offer you. I am not a security expert, nor do I know a lot about cryptography. This will get you a fully encrypted system (except for the EFI image), but you should do research on your own to figure out just how secure that is.
Please keep in mind that having an encrypted system brings problems of its own. It may, for example, make disk recovery harder in case of a disk failure. No matter what; have your imporant data backed up on a separate disk.
The steps described don’t include elaborate explanations. I urge you to look up the manpages for the things you don’t understand. It will expose you to new tools and different ways of thinking, and you may even end up remembering how this is done afterwards.
This guide was made while setting up a ThinkPad T470P, a laptop which has an
SSD connected through mSATA that produces long device names. The name of my
physical disk device is nvme0n1. This is likely equivalent to sda on
other systems and OS distributions.
I am setting up an Arch Linux system here. Some steps and tools (and the versions of these tools) might be a little different on other distros.
Desired partitioning scheme may, of course, vary. Sizes of my different partitions are based on my personal usage pattern.
Make sure that your hand-typed password is inside the very first key-slot. This will reduce boot time. GRUB will try each key-slot in turn.
Programs used
Multiple programs are used in the task to make this work. Prepare to get to know these tools just a little bit better.
gdisk(gpt partitioning)cryptsetup(LUKS)lvm(logical volume management)grub(bootloader)mkinitcpio(initial ramdisk)
Preparations
Boot up Arch Linux installation media and follow the official installation procedure up until Partition the disks.
The main storage device you want to use should be backed up before continuing.
You must know whether or not you’re running a UEFI system before continuing.
You can determine this by running efivar -l from the Arch installation shell.
Partitioning
Create a new partition table. Don’t exit gdisk until we’re done setting up
all of the partitions.
# gdisk /dev/nvme0n1
o (new partition table)
y (confirm)
The next step is determined by whether you are installing on a UEFI or BIOS system.
UEFI: Create en EFI System Partition (ESP). This is the partiton that will contain the EFI image the computer will initially boot from. I’m allocating 512MB to avoid potential disk space issues in the years to come.
n (new partition)
[blank] (default partition number)
[blank] (default start sector)
+512M (last sector)
ef00 (EFI system)
BIOS:
n (new partition)
[blank] (default partition number)
[blank] (default start sector)
+1M (last sector)
ef02 (BIOS boot partition)
BOTH: Create the boot partition. 1GB is (more than) enough to hold multiple kernels. The
type of this partition is 8300 – normal Linux filesystem.
n (new partition)
[blank] (default partition number)
[blank] (default start sector)
+1G (last sector)
8300 (Linux filesystem)
Create a partition to hold the LVM. I want this partition to span across the
rest of the disk. Subsequent volumes will be created inside this partition
with lvm, hence the partition type 8e00.
n (new partition)
[blank] (default partition number)
[blank] (default start sector)
[blank] (last sector (all available space))
8e00 (Linux LVM)
Write changes to disk, then gdisk will exit by itself
w (write changes to disk)
y (confirm write)
Take a look at the current partition table before continuing. One for EFI or BIOS, one for boot and the last one for LVM.
# gdisk -l /dev/nvme0n1
GPT fdisk (gdisk) version 1.0.3

Partition table scan:
  MBR: protective
  BSD: not present
  APM: not present
  GPT: present

Found valid GPT with protective MBR; using GPT.
Disk /dev/nvme0n1: 1000215216 sectors, 476.9 GiB
Model: SAMSUNG MZVLW512HMJP-000L7
Sector size (logical/physical): 512/512 bytes
Disk identifier (GUID): 06B4B4F3-38BA-41E3-ADF8-140EC87F194B
Partition table holds up to 128 entries
Main partition table begins at sector 2 and ends at sector 33
First usable sector is 34, last usable sector is 1000215182
Partitions will be aligned on 2048-sector boundaries
Total free space is 2014 sectors (1007.0 KiB)

Number  Start (sector)    End (sector)  Size       Code  Name
   1            2048         1050623   512.0 MiB   EF00  EFI System
   2         1050624         3147775   1024.0 MiB  8300  Linux filesystem
   3         3147776      1000215182   475.4 GiB   8E00  Linux LVM
UEFI: Create FAT32 file systems on the ESP partition
# mkfs.vfat -F 32 /dev/nvme0n1p1
File systems for the other partitions will be created after the LUKS and LVM has been set up.
LUKS and LVM
Create a LUKS container on the root partition. You will be asked for confirmation and prompted for a passphrase when running this command. Make sure this passphrase is memorable to you.
It must also be noted that the amount of hash iterations will increase the time GRUB spends on
decrypting the boot partition. GRUB is not very fast at iterating, so at my system, 100,000
iterations takes roughly 40 secods. This might be an unacceptable wait time. You will have to
benchmark yourself (cryptsetup benchmark). Don’t worry if you get this wrong the first time
around. It is not overly complicated to re-encrypt the boot partition at a later time.
You have to decide for yourself if customising the parameters for luksFormat is worth it.
If you’re unsure, remove all of them and use the defaults (cryptsetup -v luksFormat <device>).
Read the outputs of these commands carefully. In particular how to say yes. Start by creating
the luks container for encrypted boot. The boot partition must be of type luks1 since support
for LUKS2 headers is missing in GRUB right now (GRUB bug report).
# cryptsetup -v --key-size 512 --type luks1 --hash sha256 --iter-time 5000 --use-random luksFormat /dev/nvme0n1p2
Then create the root container
# cryptsetup -v --key-size 512 --hash sha256 --iter-time 5000 --use-random luksFormat /dev/nvme0n1p3
Open and mount the encrypted containers. Here, encrypted-lvm and encrypted-boot are the names of which the containers will be mapped as. They can be named anything you want, but it might make the rest of this guide harder to read if you change this.
# cryptsetup open /dev/nvme0n1p2 encrypted-boot
# cryptsetup open /dev/nvme0n1p3 encrypted-lvm
The containers are now mounted under /dev/mapper/<container name>.
Create a LVM physical volume on the lvm container.
# pvcreate /dev/mapper/encrypted-lvm
Create a volume group to hold all sub-volumes. Main is an arbitrary name I chose for my group, which will
make all sub-volumes mapped as Main-<name>.
# vgcreate Main /dev/mapper/encrypted-lvm
Now, let’s move on to creating desired logical volumes in the volume group.
Note that the swap partition should be greater than or equal to the amount of system RAM for
suspend-to-disk to work properly (16GB in this case). You can check your system with
cat /proc/meminfo.
According to ArchWiki, hibernation may be successful even if
the swap partition is smaller than the total system memory, but I want to increase my chances.
# lvcreate -L 16G Main -n swap
The optimal size of the system partition is up to you to know. My previous Arch installation have used
less than 15GB after a year of not thinking about it. However, your milage may vary greatly.
E.g. if you plan on using Docker with a default setup, all docker images and volumes will be
saved to the root partition under /var/docker, which will fill it up rather fast.
# lvcreate -L 25G Main -n root
My disk is 500GB, but using only 200GB for the home partition here to leave space for other
operating systems I plan to install in the future. To use all available space, use 100%FREE instead.
# lvcreate -L 200G Main -n home
Create filesystems on each logical volume
# mkfs.ext4 /dev/mapper/Main-root
# mkfs.ext4 /dev/mapper/Main-home
Set up the swap area
# mkswap /dev/mapper/Main-swap
And, at last, for the boot partition while we’re at it. Note that the file system for boot
is not ext4, but ext2
# mkfs.ext2 /dev/mapper/encrypted-boot
Mount the volumes
The order of mounting matters. If done incorrectly, e.g. by mounting boot
at /boot instead of /mnt/boot, will result in missing mounts in /etc/fstab
later on.
We are replicating the mounts of the finished system, with the root at /mnt.
Start out with the root partition, then mount everything else on top of that.
# mount /dev/mapper/Main-root /mnt

# mkdir /mnt/boot
# mount /dev/mapper/encrypted-boot /mnt/boot
UEFI: Be aware that nvme0n1p1 is in fact the EFI, and that it is mounted after
the boot partition has been mounted.
# mkdir /mnt/boot/efi
# mount /dev/nvme0n1p1 /mnt/boot/efi
BIOS: Don’t mount nvme0n1p1. GRUB will write to it later without mounting it.
BOTH: Mount the home partition
# mkdir /mnt/home
# mount /dev/mapper/Main-home /mnt/home
Enable swap
# swapon /dev/mapper/Main-swap
Unless you’re installing Arch Linux yourself, you’d probably want to skip directly the next step. However, it might be smart to glance through here to understand how my system is set up.
If you find it hard to follow the next steps, consult the official installation guide’s installation section.
Prepare for chroot
If you’re plugged in with ethernet but haven’t configured an IP address yet, try get one through DHCP before continuing, as it expects a working internet connection. Again, I have a crazy device name. enp0s31f6 might be eth0 on other systems or distros.
# dhclient enp0s31f6
You should now be connected to the internet.
Install base packages. Add your favorite editor instead of vim if you’d like,
and skip adding efibootmgr if you are not on a UEFI system.
# pacstrap /mnt base base-devel linux lvm2 vim grub mkinitcpio efibootmgr
Generate the fstab then open the file to see if it looks right
# genfstab -U /mnt >> /mnt/etc/fstab
Change root to the new system
# arch-chroot /mnt
System Configuration
Set the time zone and sync the hardware clock, assuming it is set to UTC
# ln -sf /usr/share/zoneinfo/Europe/Oslo /etc/localtime
# hwclock --systohc
Configure desired locales in /etc/locale.gen then generate them
# locale-gen
Configure your defaults in /etc/locale.conf. I want English language
with Norwegian date and time formats
# cat > /etc/locale.conf
LANG=en_US.UTF-8
LC_TIME=nb_NO.UTF-8
Create initial Ramdisk
These next steps assumes the root of your new system is at /. Since this is
an Arch installation, the system has changed root with arch-chroot /mnt, and the
new root is within the new system.
Configure your keymap and font in /etc/vconsole.conf (optional).
Depending on your password, setting the correct keymap may be crucial
to be able to boot. If you forgot to do this and you’re reading here
to try and save your ass, there are kernel boot params that can set the
keymap.
# example /etc/vconsole.conf
KEYMAP=us
FONT=sun12x22
Open up /etc/mkinitcpio.conf and update the HOOKS. Here, too, the order matters.
HOOKS=(base udev keyboard keymap consolefont autodetect modconf block encrypt lvm2 resume decryption-keys filesystems fsck)
I am using keyboard before autodetect to load all keyboard drivers.
If an external keyboard is connected later on (e.g. by docking) and keyboard has been set
after autodetect, it may not have a driver available and will be unusable for entering
the luks passphrase. Make special note to the presence of resume which is required for
suspend-to-disk to work.
decryption-keys is a custom hook we will implement ourselves in order to
add files to the root of the initramfs without keeping the files in our root
filesystem (as we have to if we use the FILES array). Create a new file
at /etc/initcpio/install/decryption-keys, and fill it with the below.
(Full version of this script is in a gist.)
#!/bin/bash
# This is /etc/initcpio/install/decryption-keys
function build {
  for file in /etc/initcpio/keys/*; do
    add_file "$file" "/$(basename $file)" 0400
  done
}
Create keyfiles inside /etc/initcpio/keys/ to automatically open the encrypted LVM partition
after boot has been manually decrypted. Optionally source from /dev/urandom to avoid the possibility
of waiting forever for enough entropy. You have the opportunity to know the difference if
you don’t already do.
We are creating keyfiles of 512 * 8 bytes (4096) each
# mkdir -p /etc/initcpio/keys
# dd bs=512 count=8 iflag=fullblock if=/dev/random of=/etc/initcpio/keys/encrypted-boot.key
# dd bs=512 count=8 iflag=fullblock if=/dev/random of=/etc/initcpio/keys/encrypted-lvm.key
Set proper permissions and make it real hard to accidentally do something to these files
# chmod 0000 /etc/initcpio/keys/*
# chattr +i /etc/initcpio/keys/*
Add the encrypted-boot keyfile as a decryption key for the boot partition. You will be asked to enter the passphrase for this encrypted LUKS partition.
# cryptsetup luksAddKey /dev/nvme0n1p2 /etc/initcpio/keys/encrypted-boot.key
Do the same for the encrypted-lvm partition
# cryptsetup luksAddKey /dev/nvme0n1p3 /etc/initcpio/keys/encrypted-lvm.key
Now that the LVM container has a keyfile attached, the passphrase used initially when creating the LUKS container can optionally be removed from the device. If this is done, unlocking the boot partition is the only way to recover the key-file used to unlock the LVM partition. Use the below command with caution. Depending on your security threat-model, this might be unecessary.
# # Skip this step if you don't understand the risks.
# cryptsetup luksKillSlot /dev/nvme0n1p3 0 --key-file /etc/initcpio/keys/encrypted-lvm.key
Create the initial ramdisk environment and make sure it doesn’t return any errors. Some warning may show, but errors should not occur.
# mkinitcpio -p linux
Set strict permissions for the ramdisk images now that the decryption keys are embedded in them
# chmod 0400 /boot/initramfs-linux*
These permissions will be reset every time mkinitcpio is run. Typically it
is automatically triggered after a package install or upgrade occurs that
touches either /boot/vmlinuz-linux or /usr/lib/initcpio/*. To make sure
permissions are properly set after every upgrade, create a post-transaction
hook for pacman inside /etc/pacman.d/hooks/99-initramfs-chmod.hook:
[Trigger]
Type = File
Operation = Install
Operation = Upgrade
Target = boot/vmlinuz-linux
Target = usr/lib/initcpio/*

[Action]
Description = Setting proper permissions for linux initcpios...
When = PostTransaction
Exec = /usr/bin/chmod 0400 /boot/initramfs-linux.img /boot/initramfs-linux-fallback.img
Make sure this works as intended by re-installing mkinitcpio
# pacman -S mkinitcpio
You should see a line in the output confirming that the script ran
:: Running post-transaction hooks...
[ redacted ]
(4/5) Updating linux initcpios...
[ redacted ]
(5/5) Setting proper permissions for linux initcpios...
[ redacted ]
And see that the permissions actually changed
# stat -c '%a %A %n' /boot/initramfs-linux*
400 -r-------- /boot/initramfs-linux-fallback.img
400 -r-------- /boot/initramfs-linux.img
Create bootloader with GRUB
Update the following line in /etc/default/grub
GRUB_CMDLINE_LINUX="cryptdevice=UUID=%uuid%:encrypted-lvm root=/dev/mapper/Main-root resume=/dev/mapper/Main-swap cryptkey=rootfs:/encrypted-lvm.key"
And, in the same file, un-comment the GRUB_ENABLE_CRYPTODISK=y to enable booting
from an encrypted system.
Then replace %uuid% with the UUID of the LVM partition.
This can of course be done manually, but when stuck in a terminal, it might be
easier to do with sed
# sed -i s/%uuid%/$(blkid -o value -s UUID /dev/nvme0n1p3)/ /etc/default/grub
BIOS: Register GRUB on the MBR. Note that the reference is to the disk (nvme0n1), not to the partition (nvme0n1p1):
# grub-install --target=i386-pc /dev/nvme0n1
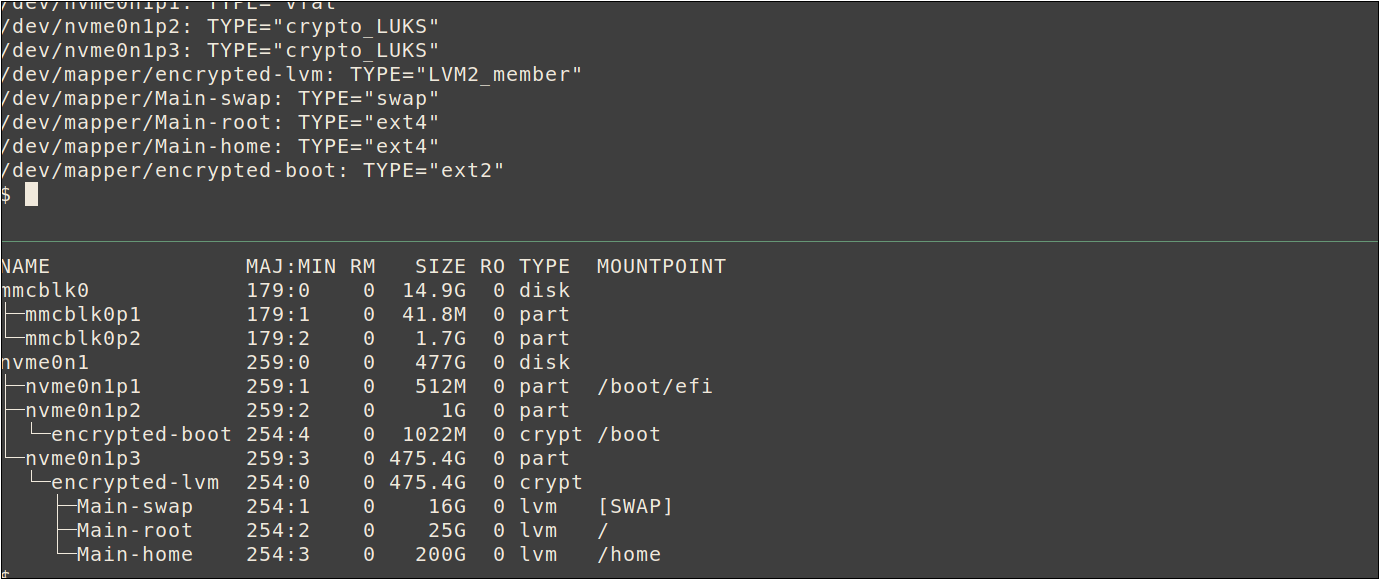
UEFI: verify that the ESP is mounted to /boot/efi
with lsblk, then install the bootloader to the ESP
# grub-install --target=x86_64-efi --efi-directory=/boot/efi --bootloader-id=grub --recheck
Both: Generate GRUB configuration.
It’s okay to get WARNING: Failed to connect to lvmetad while inside the chroot.
# grub-mkconfig -o /boot/grub/grub.cfg
Create an entry in /etc/crypttab to make systemd decrypt and mount the
boot partition automatically on successful boot using its keyfile
# inside /etc/crypttab
encrypted-boot UUID=%uuid% /etc/initcpio/keys/encrypted-boot.key luks
Again, replace %uuid% with the actual UUID of the boot partition at /dev/nvme0n1p2
# sed -i s/%uuid%/$(blkid -o value -s UUID /dev/nvme0n1p2)/ /etc/crypttab
All set! Rebooting is the only way to figure out if it was set up correctly or not.
# exit
# reboot
Please send me an e-mail if you have any troubles – or if you didn’t!
Troubleshooting
Dumped to GRUB rescue shell
If you are dumped to grub rescue mode when booting, chances are that there’s a typo or two somewhere in your configuration files. To avoid having to start over again from scratch, you can boot again with the Arch Linux installation media and unlock, mount and chroot back to where you were before rebooting.
# cryptsetup open /dev/sda3 encrypted-lvm
# mount /dev/mapper/Main-root /mnt
# cryptsetup open /dev/sda2 encrypted-boot
# mount /dev/mapper/encrypted-boot /mnt/boot
# mount /dev/sda1 /mnt/boot/efi
# mount /dev/mapper/Main-home /mnt/home
# swapon /dev/mapper/Main-swap
# arch-chroot /mnt
If you want to dig through the rescue mode, you can see my other post covering possible recovery from the shell itself.
References
Links that are not already scattered within the document
- https://wiki.archlinux.org/index.php/Mkinitcpio#Common_hooks
- https://wiki.archlinux.org/index.php/Dm-crypt/Encrypting_an_entire_system#Preparing_the_logical_volumes
- https://wiki.archlinux.org/index.php/Dm-crypt/System_configuration#mkinitcpio
- https://wiki.archlinux.org/index.php/GRUB#GUID_Partition_Table_.28GPT.29_specific_instructions
- https://jlk.fjfi.cvut.cz/arch/manpages/man/alpm-hooks.5
- https://linux-blog.anracom.com/2018/11/30/full-encryption-with-luks-sha512-aes-xts-plain64-grub2-really-slow/
This is a cross-post from blog.stigok.com.